Main Screen Overview
After opening a map from the Maps overview, RepliMap displays the Editor, featuring a central Canvas, side Panels, and Toolbars for navigation and editing.
This section provides an overview of each area.
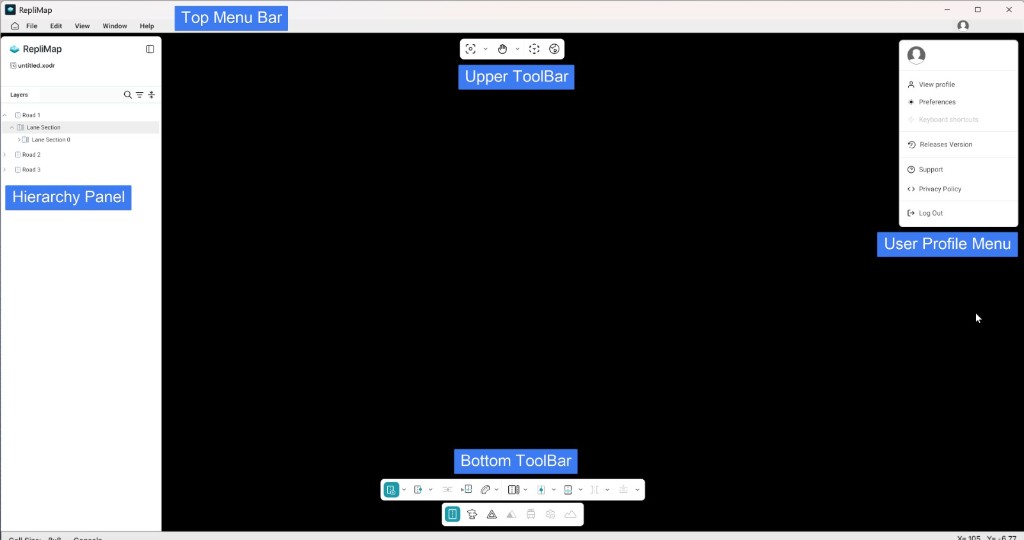
Top Menu Bar
At the top of the interface, you will find the main menu bar:
- Home Button — Returns you to the Maps overview page.
- Application menus — Includes File, Edit, View, Window, and Help options.
- User profile (right side) — Provides access to Preferences and other account settings; see Login, profile & Preferences for more details.
Each menu covers the following:
| Menu | What's inside |
|---|---|
| File | New — Create a new project Open — Open an existing project Import — Import external data (Sensor data, LiDAR Point Cloud, Reference Image, GeoJSON) Conversion Pipelines — Run data conversions (e.g., HERE HD to XODR (H2O), GeoJSON to OpenDRIVE (G2O)) Save — Save the current project Save As — Save the project with a new name or location Export — Export Map; Export XODR to GeoJSON Quit — Close RepliMap |
| Edit | Undo and Redo for basic editing steps. Left-Hand Traffic Rule — switch the active traffic rule to LHT. See Left Hand Traffic Rule (LHT). |
| View | Grid — Toggle grid visibility on the canvas Zoom Handle — (disabled for now) Map Colors — Changes how the canvas is drawn (e.g., transparent roads); used when reference data is visible to distinguish primary and connecting roads clearly Map Icons — Hides the icons of map elements/items on the canvas Helper Roads — Hides helper roads on the canvas (explained in a later section) Editor Slots — (disabled for now) |
| Window | Console; Validator; Mapbox panel. |
| Help | Documentation; Shortcuts (disabled for now); Contact us |
Hierarchy Panel (Top Left)
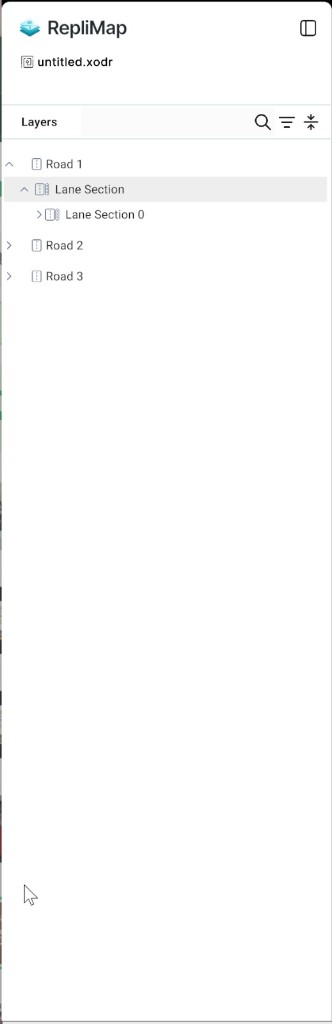
The Hierarchy (or Project) panel shows your current position within the project structure.:
- Shows the active map name.
- Lists roads so you can search by road ID and focus quickly on a specific road.
- Lets you inspect road-level content such as objects and signals.
- Provides controls to hide or show roads on the canvas.
- Lets you open the saved XODR/XML view for roads, objects, and signals.
- You can collapse the panel to make canvas editing easier.
Hierarchy panel screenshot
Upper Toolbar
The Upper Toolbar sits above the canvas (centred). It groups view, navigation, and reference data tools, and lets you switch between 2D and Scenery views.
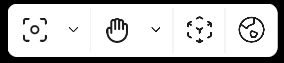
Groups include:
| Area | Examples |
|---|---|
| View / Focus | Focus centres the map and gives you an overall view of it (Shortcut: F). Ruler Shortcut (Ctrl+R) is currently disabled. |
| Pan/Gizmo Tool | Palm is used for panning across the map canvas. Move, Rotate, and Scale are gizmo tools that become active when an object is selected, enabling easier editing of objects and signals when required. |
| Reference Data Panels | Panels such as Sensor, GeoJSON, and Reference image let you reopen loaded reference data; if data is not loaded, they guide you to import it. See Data sources & conversion for details. |
| 2D and Scenery View | Quickly switch between 2D (orthogonal) and Scenery (3D) views. Use 2D for most road-network editing; objects and signals can be added from either view. |
Bottom Toolbar
The Bottom Toolbar is the main area for map editing. It includes the following tools groups:
| Tool group | What it is used for |
|---|---|
| Road | Road-level editing, including lane editing, lane markings, lane height, and road elevation adjustments. See Road tools. |
| Objects | Asset-library workflows and object-editing tools, including items such as road marks and polygon objects. See Objects. |
| Signals | Signal-library tools for traffic control elements, including traffic lights and traffic signs. See Signals. |
| Elevation Tool | Junction-level elevation tools to adjust entire junctions. See Elevation tools. (Currently disabled.) |
| Trams | Tram-network tools for tram road creation, connections, power lines, and related setup. See Trams. |
| Advanced Tools | Extra quick tools for editing automation. See Advance tools. (Currently disabled.) |

Map Canvas
The centre of the window is the main canvas, where you view and edit the road network, lanes, junctions, objects, and signals in 2D (and 3D/Scenery, if available).
You can:
- Pan and zoom using the palm tool, mouse wheel, or zoom handle.
- Select lanes, nodes, objects, and signals for editing.
- Switch between 2D and Scenery views to inspect the map from different perspectives.
Status Bar and Console
- Bottom-left — Console (or log): opens messages, warnings, or a command line depending on configuration.
- From the Console, users can export log output to a
.txtfile using the Export icon in the console panel. - Bottom-right — Context data such as cell size, cursor coordinates (X, Y), or scale—useful for precise placement and debugging.
Console log export screenshot

Related
- Account, login & preferences — profile menu and settings.
- Maps overview — switching between user, NCAP, and sample maps.
- Left Hand Traffic Rule (LHT) — enable and work with Left-Hand Traffic maps.